Wednesday, April 18, 2012

Spicy Stuffed Chicken Breasts with Tikka Masala Sauce and Cardamom Rice


Following my recent spice-rub related epiphany, I decided to dig out the little bundle of spices I was given during my last work trip to Pakistan. My trip mostly involved zipping around various markets in Punjab, talking to traders about what they sell and how much for. They were a hospitable bunch, these market traders and most of them gave me a cup of tea and a freebie of some sort. I ended each day with bananas, oranges, pistachios and other random goodies in my handbag. One of my gifts came from the market stall below where I could have quite happily sat for hours:

Cuppa and a chat in the grocery shop


I sat amongst huge sacks of spices which smelled like a cross between the inside of Hansel and Gretel’s gingerbread house and my favourite Indian restaurant in London. Here’s the little bundle which he gave me to take away:

My Pakistani garam masala : cinnamon, cardamom, cumin, cloves, pepper corns, coriander seeds.


This was months ago. I’d tucked the bundle into my spice box forgotten about it. But now that I know the joys of grinding my own spices, I decided to dig it out to make my own garam masala, though for this recipe you can just as easily use the ready mixed stuff.

This recipe is a modern twist on the classic tikka masala. Stuffing the breasts with spices and vegetables adds colour and texture and transforms it from a humble curry into elegant dinner party fare. The sauce is so rich and packed with flavour. You can blend it if you want it completely smooth, but I like my curries a little rough round the edges.

Time: 1 hour 15 mins
Rating: A bit tricky – the stuffing is a little fiddly and the sauce requires a little love but it’s so worth it!
Serves: 2
Ingredients

For the chicken:
2 large chicken breasts
50g spinach
100g mushrooms (use a variety if you can, otherwise choose a variety like chestnut mushrooms)
2cm knob ginger (about 2 tsp when chopped)
2 cloves garlic
1 medium sized hot green chilli
1.5 tsp garam masala
Small bunch fresh coriander

For the tikka masala sauce:
1cm piece ginger
1 clove garlic
30g ground almonds
½ tsp chilli powder
½ tsp paprika
1 tsp garam masala
¼ tsp cinnamon
200g chopped tomatoes (half a tin)
¼ onion
1 tbsp butter
Small bunch fresh coriander
3 tbsp water
2 tbsp single cream

For the rice:
4 cardamom pods
1 cup basmati rice
1 knob butter
1 cup water

Method
    1. Pre-heat your oven to 180°C.
    2. Firstly prepare the stuffing for the chicken breasts. Very finely chop the garlic, ginger and chilli (seeds as well, but make sure you chop these up too) and set aside. Cook the spinach in a small pan over a medium heat. Allow to cool, squeeze out the moisture and coarsely chop. Chop the mushrooms very finely (removing the stalks first).
    3. Heat a little oil in a pan and add the ginger, garlic and chilli and fry for a minute. Add the garam masala and cook for another minute. Add the mushrooms and spinach and cook for about 3-4 minutes, stirring constantly. until the mushrooms are cooked. Take the mixture off the heat and allow to cool.
    4. Next prepare the ingredients for your sauce. Very finely grate or pound in a mortar and pestle the garlic and ginger. Add the ground almonds, paprika, chilli powder, garam masala and cinnamon. Set aside until later. Very finely chop the onion and set this aside separately.
    5. Next prepare the chicken. On a chopping board slit each chicken breast in half horizontally, keeping it attached along one length. Open it up like a book and cover with a piece of cling film or parchment paper. Beat with a rolling pin, flattening the breasts evenly. 
    6. Lay the stuffing out length-ways in the middle of one half of each chicken breast and fold the other half over the top. Use cocktail sticks or wooden skewers to seal the chicken and keep the stuffing in place.
    7. Sear the stuffed chicken breast in a hot pan with a little vegetable oil, turning regularly but very gently to ensure that all sides of the breast are browned but the stuffing is still intact.
    8. Transfer the chicken to a baking sheet and roast in the oven at 15 minutes.
    9. As soon as the chicken goes into the oven, get the rice on:  heat a large knob of butter a saucepan. Add the cardamom pods and cook for 1 minute, stirring constantly. Pour in the rice, add a large pinch of salt and cook for another minute, still stirring. Add 2 cups of water using the same cup to measure as for the rice. Bring to the boil, turn down to a gentle simmer and put on the lid. Cook for 15 minutes until all the water is absorbed.
    10. Once the rice is simmering, prepare the sauce. Melt the butter, add the onions and fry for about 1 minute. Then add the prepared sauce ingredients and fry with the onions, stirring constantly for 2 minutes. Pour in the tomatoes with the water and stir well. Reduce the heat and cover with a lid. After five minutes, remove the lid, stir well and add the fresh coriander (coarsely chopped). Return the lid and continue to cook for another five minutes. Add the cream and stir well. Turn the heat down very low to keep the sauce warm until you’re ready to serve.
    11. After 15 minutes of cooking, remove the chicken from the oven, transfer it to a chopping board and allow it to rest for a couple of minutes.
    12. Using a fork, fluff up the rice and place a portion on each plate.
    13. Spoon out a generous serving of the sauce alongside the rice
    14. Remove the cocktail sticks from the chicken and slice the breasts horizontally into evenly sized pieces. Lay these out carefully over the sauce and serve. Don’t pour the sauce over the chicken because you’ll drown the nice colours in the centre.
    Cooking ahead? You can prepare the stuffing up to a day in advance and kept in the fridge, as well as the sauce which can be reheated. The chicken breasts can also be stuffed several hours in advance.


    Wednesday, April 11, 2012

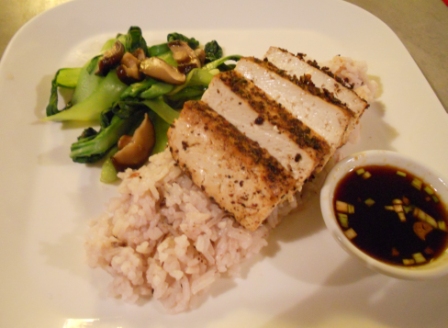
    Blackened Chinese Spiced Tofu with Ginger Dipping Sauce


    There are milestones in every cook’s life when they make something for the first time and think, “I can never go back”. This is my third such moment. The first came when I first visited Bangkok four years ago and learned to make my own curry paste. The second was a year ago when I bought my first home-made ice-cream machine. And the third was last week when I made my own spice rub for this tofu dish.

    I am not a chef; I’m a girl who loves learning to cook new things. To some a spice-rub is probably fairly basic, but to me it was a new step on my culinary journey. During my spice-rub epiphany I realised how wonderful it is to season food with a combination of flavours and a texture that works for your dish. I can’t believe that I have gone through life never questioning Chinese five spices or garam masala. Having finally figured out the delicate combination of beautiful spices that go into those mixes…well, I feel like I just cracked the Da Vinci Code or something.

    Anyway, I suggest doubling or trebling the quantities for the spice rub and keeping the rest in an airtight container for future use. I have already used it since on chicken breasts and pork belly.

    This dish follows my golden rule for vegetarian cooking: treat the main element as you would meat – so in this case, marinate, spice rub and fry. My veggie guests all gave it a big thumbs up.


    Time: 1 hour
    Rating: A little effort - the spice rub takes a bit of work if you are grinding by hand, and there are a few different stages and processes to this dish
    Serves: 2

    Ingredients

    1 block firm tofu

    For the Marinade:
    2 tbsp light soy sauce
    1 tbsp sesame oil

    Spice Rub:
    1 tsp black pepper corns
    2 star anise
    1 tsp Szechuan pepper corns
    1 inch cinnamon stick
    1 tsp dried ginger
    ½ tsp salt
    ½ tsp sugar

    Dipping Sauce:
    120ml light soy sauce
    60ml cup red wine vinegar
    2 tsp minced ginger
    3 tbsp brown sugar
    2 spring onions

    Serve with steamed wild rice, stir-fried pak choi and sliced shitake mushrooms

    Method

    1. First marinate the tofu. Remove it from its package and blot dry using kitchen roll. Cut in half into smaller blocks and place in a small shallow dish.
    2. If you are making steamed rice, put this on now and keep it warm until all the other components are ready.
    3. Combine the soy sauce and sesame oil and pour over the tofu. Leave to marinate in the fridge for half an hour, turning over at least once.
    4. Next prepare your dipping sauce.  Very finely mince the ginger and combine with the soy sauce and red wine vinegar. In a small saucepan melt the brown sugar on high heat, until it is just melted but not burnt. Add the soy sauce, ginger and red wine and reduce to a medium heat. The sugar will harden but don’t worry. Bring the mixture to the boil until the sugar is melted again. Remove from the heat and allow to cool. Once cooled, finely chop the spring onions and add to the sauce before transferring to a small serving bowl.
    5. Next prepare your spice rub. Using either a coffee grinder, spice grinder or mortar and pestle, grind the first four spice rub ingredients one at a time. Don’t grind them so much that they become a fine powder as you want to keep some of the texture, but try not to leave any very large chunks in there. Add the remaining spice rub ingredients, combine and spread the mixture out on a plate.
    6. Remove the tofu from the marinade and blot dry onto some kitchen roll, pressing down firmly to help the moisture escape. The drier you can get the tofu, the tastier and firmer it will be so repeat this several times until the kitchen roll stays dry.
    7. Once dry, place the tofu onto the spice rub and press down. Turn each block over and repeat several times until there is a nice thick crust.
    8. Heat a little vegetable oil in small frying pan until it is very hot. Place the tofu squares in the pan and cook for about 2-3 minutes on each side and then another minute on each side. You want it to take on a nice char-grilled look but not burnt to a crisp! Be very careful when you turn them over to avoid scraping off the rub. Use tongs if you have them.
    9. If you are serving pak choi and sliced shitake mushrooms, put these on immediately after the tofu goes into the pan. Cook in a hot wok with a little bit of vegetable oil and a dash of soy sauce, stirring constantly.
    10. Remove the tofu from the pan and cut each block into evenly sized strips. Serve with the rice, greens and dipping sauce.

    Sunday, April 8, 2012

    Banana Coconut and Almond Ice-Cream


    You may have noticed a dearth of dessert recipes on this blog. It was brought to my attention by one of my followers. “Tough crowd” I thought. But actually, it’s a fair point. I’ve been quite open about the fact that I suck at baking and am terrified by the precision that deserts require. It doesn’t fit at all well with my mad scientist approach to cooking.
    However ice-cream is a different story. You have to stick to basic proportions but it’s not nearly as rigid and unforgiving as baking and lets you to go, “hmmmm, I wonder what would happen if I added this…” without the whole thing imploding before your eyes. Like replacing some of the ordinary cream with coconut milk. It seemed like a fitting thing to do. Coconuts are everywhere in Thailand a key flavour in sweet and savory dishes.
    Coconut seller at Klong Toey market in Bangkok

      1. Peel and chop the bananas into even sized pieces. Put them into a plastic tub and into the freezer until frozen.
      2. Make sure you refrigerate the coconut milk and cream until you are ready to make the ice-cream – the secret of getting your ice-cream to set is making sure all the ingredients are cold already when they go into the ice-cream maker.
      3. With a food processor, mortar and pestle or a good knife and chopping board, chop or crush the almonds fairly finely, leaving a few bigger chunks for texture.
      4. Put the frozen bananas into a blender or food processor and blend until they are a smooth paste. Add all of the other ingredients except for the almonds and blend briefly until creamy. Don’t blend for too long as this will warm the mixture up.
      5. Add the almonds and stir in (don’t blend – you don’t want them to be broken up too finely)
      6. Churn in an ice-cream maker according to manufacturer instructions
      7. The ice-cream should come out fairly solid. If it isn’t, place in a plastic tub and in the freezer for half an hour.


    One of the principles of Mango Ginger recipes is that they don’t require you to use specialist ingredients or equipment. I am aware that an ice-cream maker is a fairly specialist piece of equipment. But my experience with it has been so wonderful that I’m allowing myself to break my own rule. Not only will it give you hours of fun, but making ice-cream is one of those things where the ratio of effort required to level of awe from your guests is definitely in the cook’s favour.

    Lots of ice-cream recipes suggest making a custard first. But this one doesn’t need it – good quality, thick double cream does the trick. And trust me on the salted almonds, it’s only a tiny hint in the end but it really works. I was so happy with this I am even considering facing my fear of making desserts head-on!

    Time: 25 mins plus freezing time (may vary according to your ice-cream maker)
    Rating: Couldn't be simpler
    Serves: 3-4 (or 1 if you are my husband) 

    Ingredients

    3 ripe bananas
    1 tbsp sugar
    175ml coconut milk
    200ml double cream
    ¼ teaspoon vanilla extract
    40g roasted salted almonds

    Method

    Friday, April 6, 2012

    Thai Fish en Papilotte with Lime & Garlic Butter Sauce


    I used to live in Paris, which is where I first tasted a version of this dish.  I thought it sounded so haute-cuisine, before I realised it literally translated as ‘in parchment’. But when I tasted it I realised that this simplicity is exactly what makes it so delicious. The parchment paper is folded into a small parcel for a fillet of fish and a few key ingredients. It looks like this:

    This is how the fish should look when it's wrapped up

    The fish steams in its own juices and absorbs the flavours around it. You are left with melt-in-the-mouth tenderness. And it’s a super healthy way to cook.

    The Parisian version I had was cooked with garlic, lemon and fresh herbs. Here I have Thai’d the recipe up. The first time I made the dish, I didn’t make the sauce on the side. My husband and long-suffering taster said it was delicious but a bit dry as a dish and needed something to bring it all together. I glared at his insolence but I knew he was right – the juice produced during cooking was tasty but there wasn’t much of it. So it was back to the drawing board to find the right sauce to pair with it.

    I love this sauce and think it goes perfectly because it doesn’t overpower the delicate flavour of the fish. Though if you do go down the butter route, the dish does cease to be especially healthy…but I never claimed to be a health food blogger.

    The fish right after it came out of the oven


    Time: 40 mins
    Rating: Easy, but requires patience with knife work
    Serves: 2

    Ingredients

    For the fish:
    2 chunky fillets of white fish like sea bass or tilapia
    Small knob ginger, peeled
    1 medium-sized red chilli
    1 shallot
    1 lime
    8 kaffir lime leaves
    2 sticks lemongrass
    3 tbsp fish sauce
    ½ tsp sugar

    For the sauce:
    1 shallot,
    Zest of 1 lime, juice of 2 limes
    2 cloves garlic
    100ml white wine
    30g butter
    Pinch of salt

    Method:

    1. Preheat the oven to 180°C.
    2. If you are serving rice, put this on first – you can keep it warm while the other components cook.
    3. Prepare the ingredients for the fish. Cut the shallot in half width-ways and finely slice. Finely slice the chilli, ginger and lime zest into very thin matchsticks – take time to do this carefully to get thin, delicate pieces.
    4. Cut the lemongrass stalks in half lengthways.
    5. Mix together the fish sauce, lime juice and sugar
    6. Cut two pieces of parchment paper about 30cm long and lay them out flat. Place four kaffir lime leaves in a row in the centre of each piece and lay a fish fillet on top.
    7. Put the two halves of a lemongrass stalk either side of the fillet and sprinkle the slivers of shallot, ginger, lime zest and chilli across the top of the fillet evenly. Gently spoon over the fish sauce and sugar mixture.
    8. Gather up the edges of the parchment paper over the fish. Twist it at both ends and fold over the edges of the paper in the middle, leaving space between the fish and paper to allow space for steam. Seal the edges well to trap the steam.  It should look like the picture above.
    9. Bake in the oven for 10-13 mins depending on the size of your fillet.
    10. While the fish is cooking make your sauce. Coarsely chop the shallot, garlic and lime zest. Heat a little olive oil in a small saucepan, gently fry the shallot, garlic and lime zest and fry over a medium heat until softened but not coloured (about a minute).
    11. Add the white wine and lime juice, bring to the boil and cook for 2 minutes
    12. Strain through a sieve and return the strained sauce to pan, discarding the rest.
    13. Re-heat over a low heat and add the butter a few pieces at a time. Whisk continuously until all the butter has melted and incorporated into the sauce. Season with a pinch of salt.
    14. Once the butter has all been incorporated remove from the heat and cover - don’t let the sauce overheat as this will make the butter clarify (separate) and your sauce will be ruined. You can re-heat it for a moment right before serving.
    15. If you are also serving pak choi, put a  large wok on a high heat with a little water and stir-fry the greens for 2-3 minutes stirring continuously.
    16. Remove the fish from the oven and transfer from the paper to a dinner plate using a spatula. Leave the lemongrass and kaffir lime leaves behind. Pour the juices from the bag over the fish. Plate up the rice and vegetables and serve the sauce alongside.

    Cooking ahead? The fish can be prepared several hours in advance (up to the end of step 8 and refrigerated). The sauce may split if made ahead however.

    Tuesday, April 3, 2012

    Burmese Baba Ganoush


    Yes, I know we’re meant to call it Myanmar these days but I like the alliteration too much, so Burmese baba ganoush it is. But I promise to be more PC and call it Myanmar elsewhere.

    And what a time to be celebrating Myanmar! This is a country on the cusp of enormous political and social change. This week’s by- elections saw the opposition party claim a landslide victory. Not long ago their leader Aung San Suu Kyi was under house arrest. This week she is promising “peace and prosperity” for her country. A country which has remained closed off to the world for so long is about to open its doors - we are watching history being made!

    I was lucky enough to visit Myanmar for work for the first time last week. Yangon, the capital, is  more green and laid back than I thought any Asian city had it in them to be. A highlight for me was the Shwedagon Pagoda, a Buddhist temple that manages at once to be magestic and serene:

    Families, monks and couples strolling around the pagoda

    I was one of few foreigners, and people came to chat to me out of curiosity and hospitality. It gives Bangkok’s temples a run for their money, not least because it is still a place for Myanmar people to meet and prey, rather than a tourist attraction:

    Lighting candles in prayer

    I managed to do some of my work while sampling the national food. Myanmar is bordered by Bangladesh, Thailand, China and India and there are flavours of each country all over, not least in the cuisine. I ate dhal which took me back to India, stewed pork which reminded me of Bangkok’s china town, and delicious stir-fried leafy greens like those which I find in Bangkok. Maybe soon the cafes will be blasting out pop music to Scandanavian backpackers eating banana pancakes. But for now, the food is local and good. I ate in small restaurants where you pick lots of tiny dishes and eat them with rice, vegetable broth and pickles.

    Small dishes laid out for lunch in a local cafe

    My favourite tiny dish was the smoky eggplant "salad". Why the inverted commas, you ask? Well it’s called a salad in Myanmar but by my standards this is not a salad. Call me old fashioned but to me there are two essential qualities for a dish to be classes a salad: green and crunch. The crunch in this dish is cursory and comes from nuts rather than vegetables. And the green is just a sprinkling from the coriander. Delicious it is, a salad it is not. So I’m calling it a dip. That way everyone knows where they stand. As a dip, I suggest that it is best served with flatbread. And in fact, why not serve it with the Bangladeshi flatbread and hummus to create an Asian Fusion Mezze?


    Time: 40 mins
    Rating: Easy
    Serves: 4-6 as a starter or snack

    Ingredients

    2 medium aubergines (or eggplants if you’re American)
    2 small shallots
    2 garlic cloves
    1 ½  tbsp vegetable oil
     1 tsp sesame oil
    1 tsp sesame seeds
    2 tsp peanuts (roasted, salted)
    Small handful of fresh coriander leaves
    Juice of half a lime
    1 tsp soy sauce if you're a vegetarian, fish sauce if you're not

    Flat bread or vegetable crudités to serve

    Method

    1. Start by cooking your aubergines. Prick the aubergines all over with a fork or skewer (this will stop the skin bursting later) and place on a baking sheet under a hot grill. Allow the skin to char and turn them over to cook the other side. Cook them for about 30 mins in total, rotating them regularly until they are blackened all around and soft all the way through. Remove from the grill and allow to cool.
    2. While the aubergines are cooking, prepare your other ingredients. Cut the shallots in half lengthways and then very thinly slice them, width-ways. Finely chop the peanuts. Lightly toast the sesame seeds in a pan – over a medium heat with no oil, stirring frequently. Finely chop the coriander.
    3. Prepare your garlic. Slice the garlic cloves width-ways as thinly as possible. Combine the two oils and heat in a small frying pan. When the oil is hot add the garlic slices and fry them, stirring constantly to make sure both sides cook evenly. As soon as they turn golden brown remove them from the heat and take them out of the oil. If you burn them at all they will taste bitter. Keep the oil aside, you’ll need it later.
    4. When the aubergines have cooled slice them in half lengthways with a knife and open them up. Remove the main clusters of seeds (but don’t worry about removing all the seeds) and scoop out the flesh into a bowl with a tablespoon.
    5. Mash the flesh (it’s up to you how smooth or chunky you want it), adding a tablespoon of the garlic oil. Stir in the fish sauce, lime juice, shallots, sesame seeds, peanuts, chopped coriander and half of the fried garlic. Transfer to your serving dish and sprinkle over the remaining garlic.

    Sunday, April 1, 2012

    Versatile Blogger Award


    So there I was, a lazy Sunday morning,  polishing off the last of the ice-cream (home-made of course) from last night’s dinner party, and I turned on my laptop to discover I’d won an award! I felt so unprepared, so under-dressed, so overwhelmed!

    Let me explain. The Versatile Blogger Award is a chance for bloggers to publicly commend the good work of other bloggers. The best bit is that as well as being nominated yourself, the rules state that you must share the love and nominate up to fifteen other bloggers whom you think are deserving of the same accolade.

    But first things first, where are my manners, a huge from-the-bottom-of-my-heart thank you to the lovely Katie who nominated me for my award. Katie authors ChemEGirl Cooks. She is a Chemical Engineer who cooks fun, innovative, wheat and dairy-free food. And her sense passion for food is evident in all of her recipes.

    Oh, food bloggers are such nice people! Who needs real friends anymore?! Anyway, without further ado, the nominations for the Mango Ginger Versatile Blogger Award are:

    S       FDAathome: Fine Dining At home. David clearly has an exceptional palette and a great eye for presentation. He’ll get you cooking restaurant standard food at home. And he’s my new foodie pen pal, which is why he’s top of my list.
    S       Mistress of Spices: Ramya (aka the Mistress) is a fellow Bangkokian and as a vegetarian is introducing me to the greener side of Bangkok life. Hope to meet her in person some day.
    S       The Coconut Monkey: These guys are right up my street. They’re a London-based catering company and the blog includes some of their best recipes and reviews of other places too. They use all sorts of flavours but have a special penchant for all things Asian.
    S       Feeling Food: The food on this sight is quite simply beautiful, not least because of the stunning photography. Sinead has a lovely way with words too.
    S       Rita Cooks Italian: Rita is another Londoner and she does indeed cook Italian – and with mouth-watering results.
    S       Coconut Raita: Reena gives the Indian flavours of her childhood a modern revival with clever and delicious recipes. I love how she waves the Asian Fusion flag!
    S       The Scent of Green Bananas: Inspiring food reviews and beautiful photography from all over the place by Santos
    S       All That I’m Eating: Caroline is a great writer and an exciting and open approach to food. There is something for everyone in this blog.
    S       The Secret Food and Travel Reviewer: Sparky writes fun reviews of restaurants, mostly in London, which I love reading when I’m a little homesick for the Big Smoke
    S       Dirty Girls Kitchen: These fun-loving, foul-mouthed girls make me laugh out loud! And they cook some very tasty-looking food too.

    The rules ask that I also tell you seven things about me, so here goes:

    1. In my day job I am an aid worker. I do this based from Bangkok and travelling across Asia, which is where the Asian Fusion inspiration comes from.
    2. I love rock climbing, not least because it stops me ending up the size of a house from all the food I eat.
    3. My food heaven is aubergines (eggplants). Glossy, purple, versatile, squishy goodness. They make me so very happy.
    4. My food hell is porridge…urgh, makes me gag just thinking about it. Had I been in Goldilocks’ shoes, I’d rather have starved.
    5. I have no sense of direction whatsoever. Being lost is a normal state of being for me.
    6. I’m always cold. That’s why I had to leave London and move to Thailand.
    7. Be warned. Often, when I appear to be listening or concentrating, I’m not. I’m actually thinking about food.
    For you nominees, here are the Versatile Blogger rules which I am asked to share with you:

    S       Thank the person who gave you this award. 
    S       Include a link to their blog.
    S       Next, select up to 15 blogs/bloggers that you’ve recently discovered or follow regularly. 
    S       Nominate those bloggers for the Versatile Blogger Award.
    S       Finally, tell the person who nominated you 7 things about yourself. 

    There are also a few add-on rules:

    S       In the same post, include this set of rules. 
    S       Inform each nominated blogger of their nomination by posting a comment on each of their blogs

    The Versatile Blogger Award is  a great way to introduce different bloggers to each other and to promote quality blogs that awardees and their readers may not have discovered otherwise.”

    Saturday, March 31, 2012

    The Ultimate Veggie Burger – Thai Style


    A couple of weeks ago an Irish friend was in town on St Patrick’s day. Somehow this event has passed me by until now and I’ve never understood its significance beyond drinking a lot. And I still don’t because by the time I got round to asking him to explain it to me, I’d already drunk too much and now can’t remember. Something about snakes and a bloke who it turns out was actually English.

    I don’t normally hang out in the farang (foreign) pubs and bars in Bangkok – I’m far too much of a snob for that, I'm all about the trendy rooftop bars. But I was warmed by my friend’s patriotism and nostalgia, and so was more than happy to get into the spirit of things, don a green t-shirt and tour the Irish pubs, which that night were bursting at the seams.

    Experience has taught me that endurance on a big night out relies on a good feed beforehand so I took responsibility for feeding our party. Among us was a vegetarian.  I have made my feelings on vegetarianism clear in other blog posts: I am an ex-veggie, slightly ashamed that I abandoned the cause (though not that ashamed when faced with pork belly) and determined that no vegetarian should ever feel like a second class diner in my home. So I decided that we would fuel up with a vegetarian meal, as hearty and Guinness-absorbing as any meat feast.

    Friends tucking into the burgers around my table
    I have had mixed experiences with making veggie burgers in the past because it’s difficult to make them firm enough but still tasty. But I’m pretty sure I’ve cracked it with this recipe. This burger is, if I do say so myself, quite simply epic. It’s scrumptious, firm, filling, easy to make and really nutritious too. And put to the ultimate test, it saw us through a full night of Paddy’s Day fun, see:

    Taken in Irish pub #4 of the night: O'Reilly's in Sala Daeng

    I served the burger with the same accompaniments and garnishes as I did the Thai burger, only I didn’t have sweet potatoes so I used normal ones instead (fitting, given the Irish theme).

    Time: 45 minutes
    Rating: Easy, just a bit of chopping.
    Serves: Makes 6 - They will keep very well in the freeze if you don’t need the whole batch at once

    Ingredients

    225g firm tofu, finely chopped
    1 aubergine (about 250g)
    100g shitake mushrooms
    1 carrot
    60g Breadcrumbs (you can make this from about 1-2 slices wholemeal bread)
    80g cashew nuts
    1 egg
    1 small onion
    2 garlic cloves,
    1 stick lemongrass
    1 inch knob ginger
    2 small red chillis
    1 bunch coriander
    2 kaffir lime leaves
    2 tbsp dark soy sauce
    2tbs flour
    salt and freshly ground black pepper
    vegetable oil for cooking

    Garnish:
    Sweet chilli sauce
    Garlic and lime mayo
    Slices of cucumber (pickled if you like), onion, tomato

    Method

    1. Start by very finely chopping the mushrooms and aubergine, so they’re about ½ centimetre cubed. Fry them in a wok or pan with a little vegetable and 1 tablespoon of the soy sauce until they are soft all the way through. Don’t be tempted to add any more liquid, you need them to be dry so they don’t make the burgers soggy. When they are done, set them aside to cool.
    2. Prepare all of your other ingredients: Finely pound the cashews in a food processor or mortar and pestle – you should have a fine powder with a few lumps for texture. Chop the tofu into small pieces about the same size as the aubergines and mushrooms. Finely grate the carrot. Finely chop the onion, garlic, chilli, coriander, ginger, lemongrass and kaffir lime leaves. Take time to do this properly – large chunks won’t be pleasant. The lemongrass and lime leaves are particularly tough and you should chop these as finely as you can. For the chillies, leave the seeds in (finely chopped) if you want them spicy, remove if not.
    3. Combine all of the burger ingredients into a large bowl and combine with your hands. Then divide the mixture into six and form into large patties. It should be a nice firm mixture but if not add a few more breadcrumbs and a bit more flour
    4. Heat a frying pan or griddle pan with a little oil over a medium heat and gently place the burgers in the pan. After 3-4 minutes turn over and cook for 3-4 minutes on both sides. Turn over again and cook for another 2 minutes on each side.
    5. Serve in the buns with the sauces and other garnishes.

    Cooking ahead? You can make these a day in advance and keep them in the fridge, or well ahead and freeze, defrosting several hours before cooking.